TableView(테이블뷰)는 델리게이트 패턴으로 구성하여 설계할 수 있다.
- Delegate Pattern(델리게이트 패턴)을 사용하여 TableView를 컨트롤 할 수 있다.
- UITableViewDataSource 프로토콜을 추가하여 프로토콜에 필수 메소드로 셀에 대한 설정
- UITableViewDelegate 프로토콜을 추가하여 셀을 클릭했을 때 메소드를 추가할 수 있다.
import UIKit

class ViewController: UIViewController {

    @IBOutlet weak var tableView: UITableView!

    override func viewDidLoad() {
        super.viewDidLoad()
        // Do any additional setup after loading the view.

        // Delegate Pattern(델리게이트 패턴) - dataSource(셀 구성)
        tableView.dataSource = self

        // Delegate Pattern(델리게이트 패턴) - delegate(셀 컨트롤)
        tableView.delegate = self
    }
}

// 프로토콜 구현 익스텐션
extension ViewController: UITableViewDataSource, UITableViewDelegate {

    // 테이블 뷰의 셀의 갯수 생성 함수
    func tableView(_ tableView: UITableView, numberOfRowsInSection section: Int) -> Int {
        return 1
    }

    // 테이블 뷰의 셀의 내용 생성 함수
    func tableView(_ tableView: UITableView, cellForRowAt indexPath: IndexPath) -> UITableViewCell {
        let cell = tableView.dequeueReusableCell(withIdentifier: "TableViewCell") as! TableViewCell

        cell.tableImage.image = #imageLiteral(resourceName: "SwiftLogo")
        cell.tableTitle.text = "Swift"
        cell.tableDesc.text = "Apple Development Language"

        return cell
    }

    func tableView(_ tableView: UITableView, didSelectRowAt indexPath: IndexPath) {
        // 화면에 indexPath 랑 같은 영화 이미지와 제목, 설명 삽입
        performSegue(withIdentifier: "toDetail", sender: indexPath) //세그웨이 식별자


    }
}

TableView 선택

오토레이아웃으로 화면을 꽉 채워준다.

'Table View Cell' 은 테이블에서 하나 하나의 셀이다.

Cell 의 크기를 임의적으로 늘려준다.

Cell 에 추가할 Image View
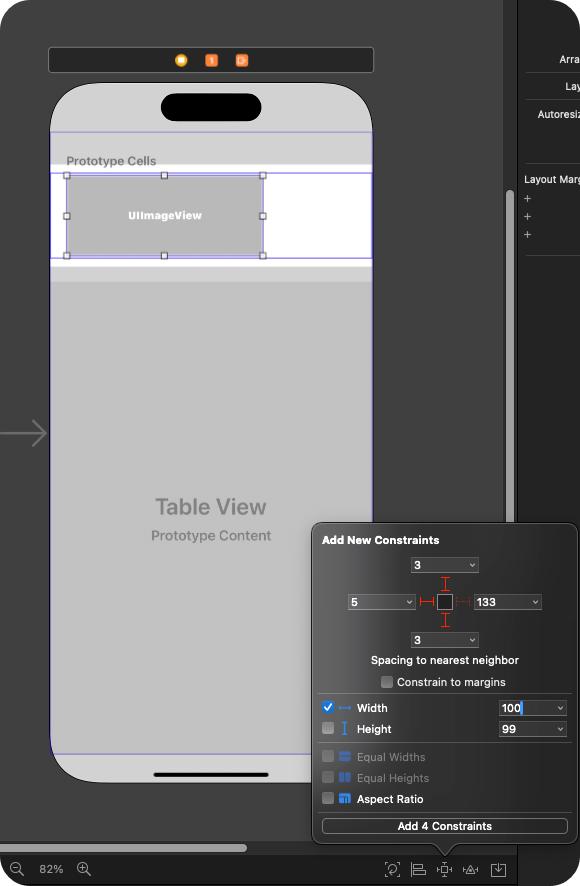
오토레이아웃을 통해 셀 안에서 크기 설정

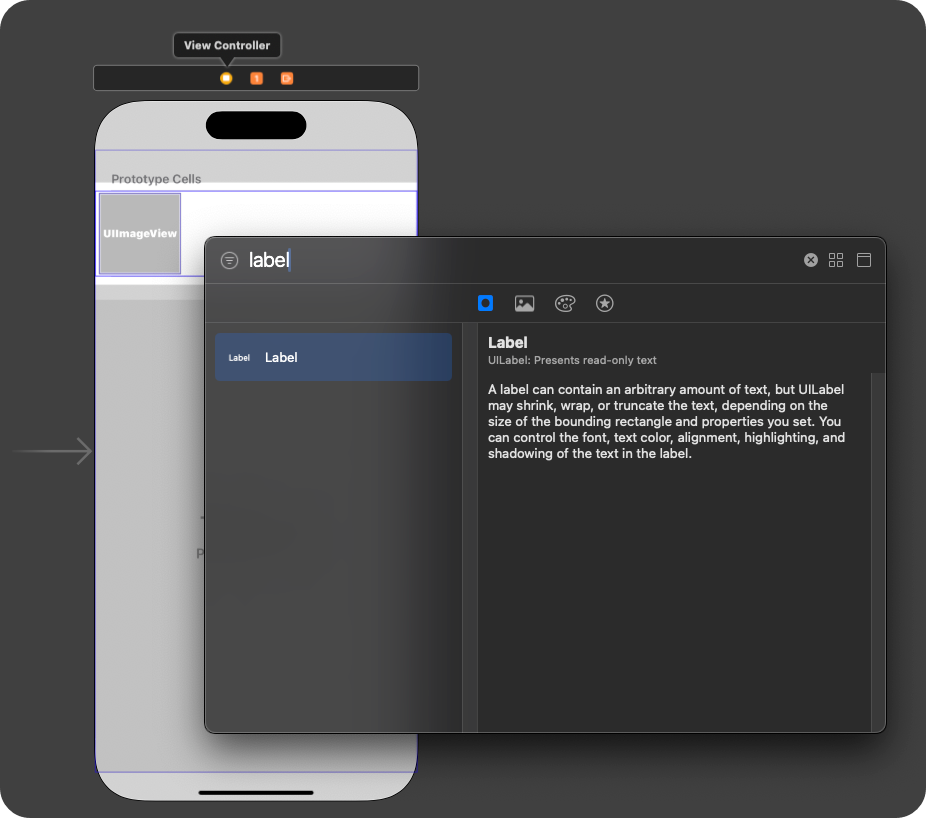
Cell에 추가할 Label

Label 2개를 Stack View 묶는다.

Stack View 로 묶인 객체를 오토레이아웃을 설정

밑 Label의 Height를 설정

스토리보드에서의 테이블 뷰 설정 완료

Asset 에 셀에 사용할 이미지를 하나 추가


추가한 TableViewCell 클래스를 스토리보드에서 연결

IBOutlet으로 속성들을 연결

import UIKit

class ViewController: UIViewController {

    @IBOutlet weak var tableView: UITableView!

    override func viewDidLoad() {
        super.viewDidLoad()

        // Delegate Pattern(델리게이트 패턴) - dataSource
        tableView.dataSource = self
    }
}


// Delegate 패턴 구현할 익스텐션(프로토콜)
extension ViewController: UITableViewDataSource {

    // 테이블 뷰의 셀의 갯수 생성 함수
    func tableView(_ tableView: UITableView, numberOfRowsInSection section: Int) -> Int {
        return 1
    }

    // 테이블 뷰의 셀의 내용 생성 함수
    func tableView(_ tableView: UITableView, cellForRowAt indexPath: IndexPath) -> UITableViewCell {
        let cell = tableView.dequeueReusableCell(withIdentifier: "TableViewCell") as! TableViewCell

        cell.tableImage.image = #imageLiteral(resourceName: "SwiftLogo")
        cell.tableTitle.text = "Swift"
        cell.tableDesc.text = "Apple Development Language"

        return cell
    }
}

아직 클릭을 했을 때는 아무 일도 일어나지 않는다.
사용자가 클릭하거나 셀과 상호작용이 일어날 때 어떤 일이 벌어지게 하려면 UITableViewDelegate 프로토콜을 이용해야 한다.

클릭했을 때 화면 전환을 할 새로운 뷰 컨트롤러 생성
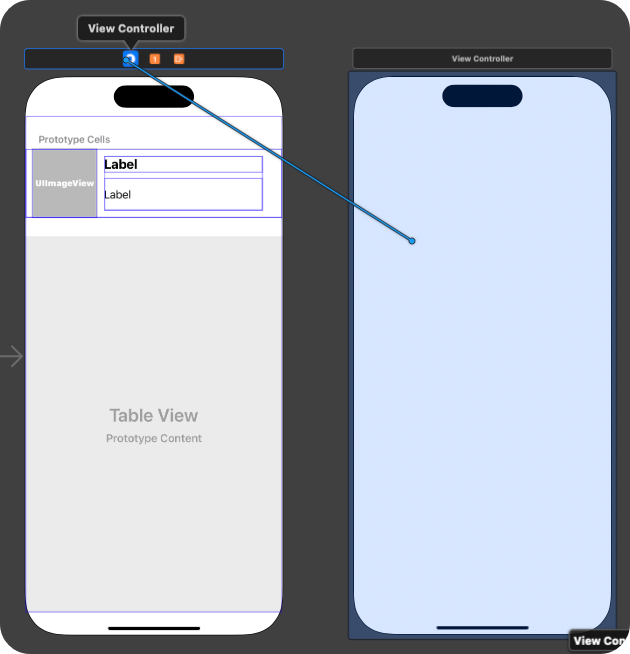

세그웨이를 연결하여 Present로 연결
[화면 전환] Segue - 간접 세그웨이 (Storyboard + Code)
간접 세그웨이는 직접 세그웨이와 다르게 객체로 직접적으로 연결하는 것이 아닌 뷰 컨트롤러로 연결한다. 뷰컨트롤러를 통해 세그웨이로 화면 전환// Identifier로 어떤 세그웨이인지 판별 후 해
usiacode.tistory.com

import UIKit

class ViewController: UIViewController {

    @IBOutlet weak var tableView: UITableView!

    override func viewDidLoad() {
        super.viewDidLoad()
        // Do any additional setup after loading the view.

        // Delegate Pattern(델리게이트 패턴) - dataSource(셀 구성)
        tableView.dataSource = self

        // Delegate Pattern(델리게이트 패턴) - delegate(셀 컨트롤)
        tableView.delegate = self
    }
}


extension ViewController: UITableViewDataSource, UITableViewDelegate {

    // 테이블 뷰의 셀의 갯수 생성 함수
    func tableView(_ tableView: UITableView, numberOfRowsInSection section: Int) -> Int {
        return 1
    }

    // 테이블 뷰의 셀의 내용 생성 함수
    func tableView(_ tableView: UITableView, cellForRowAt indexPath: IndexPath) -> UITableViewCell {
        let cell = tableView.dequeueReusableCell(withIdentifier: "TableViewCell") as! TableViewCell

        cell.tableImage.image = #imageLiteral(resourceName: "SwiftLogo")
        cell.tableTitle.text = "Swift"
        cell.tableDesc.text = "Apple Development Language"

        return cell
    }

    func tableView(_ tableView: UITableView, didSelectRowAt indexPath: IndexPath) {
        // 화면에 indexPath 랑 같은 영화 이미지와 제목, 설명 삽입
        performSegue(withIdentifier: "toDetail", sender: indexPath) //세그웨이 식별자


    }
}


'UIKit' 카테고리의 다른 글
| [TabBar] Code로 구현 (0) | 2024.08.02 |
|---|---|
| [TabBar] Storyboard로 구현 (0) | 2024.08.02 |
| [Navigation Controller] Code로 세팅 (0) | 2024.08.01 |
| [Navigation Controller] Storyboard로 세팅 (0) | 2024.08.01 |
| [Navigation] Only Code (pushViewController()로 화면 전환) (0) | 2024.08.01 |