코드를 구현하기 위해서는 네비게이션과 마찬가지로 기본 ViewController 보다 아래에 탭바 컨트롤러를 깔아야 하기 때문에 Scene Delegate 파일에 코드가 필요하다.
기존의 뷰 컨트롤러에 더해 탭바를 위한 새로운 뷰 컨트롤러를 두개 더 만든다.

import UIKit

class ViewController: UIViewController {

    private lazy var myLabel: UILabel = {
        let label = UILabel()
        label.text = "FirstViewController"
        label.font = UIFont.systemFont(ofSize: 18)
        label.textAlignment = .center
        label.textColor = #colorLiteral(red: 0, green: 0, blue: 0, alpha: 1)
        // label.sizeToFit()
        view.addSubview(label) // 추가
        label.numberOfLines = 0 // 줄바꿈 무한

        return label
    }()


    override func viewDidLoad() {
        super.viewDidLoad()
        // Do any additional setup after loading the view.
        view.backgroundColor = .white
        myLabelSetup()
    }

    // [AutoLayout]
    func myLabelSetup() {
        myLabel.translatesAutoresizingMaskIntoConstraints = false

        NSLayoutConstraint.activate([
            myLabel.leadingAnchor.constraint(equalTo: view.leadingAnchor, constant: 30),
            myLabel.trailingAnchor.constraint(equalTo: view.trailingAnchor, constant: -30),
            myLabel.topAnchor.constraint(equalTo: view.topAnchor, constant: 100),
            myLabel.heightAnchor.constraint(equalToConstant: 40)
        ])
    }

}
원래의 뷰 컨트롤러

import UIKit

class SecondViewController: UIViewController {

    private lazy var myLabel: UILabel = {
        let label = UILabel()
        label.text = "SecondViewController"
        label.font = UIFont.systemFont(ofSize: 18)
        label.textAlignment = .center
        label.textColor = #colorLiteral(red: 0, green: 0, blue: 0, alpha: 1)
        // label.sizeToFit()
        view.addSubview(label) // 추가
        label.numberOfLines = 0 // 줄바꿈 무한

        return label
    }()

    override func viewDidLoad() {
        super.viewDidLoad()
        // Do any additional setup after loading the view.
        view.backgroundColor = .lightGray
        myLabelSetup()
    }

    // [AutoLayout]
    func myLabelSetup() {
        myLabel.translatesAutoresizingMaskIntoConstraints = false

        NSLayoutConstraint.activate([
            myLabel.leadingAnchor.constraint(equalTo: view.leadingAnchor, constant: 30),
            myLabel.trailingAnchor.constraint(equalTo: view.trailingAnchor, constant: -30),
            myLabel.topAnchor.constraint(equalTo: view.topAnchor, constant: 100),
            myLabel.heightAnchor.constraint(equalToConstant: 40)
        ])
    }


}
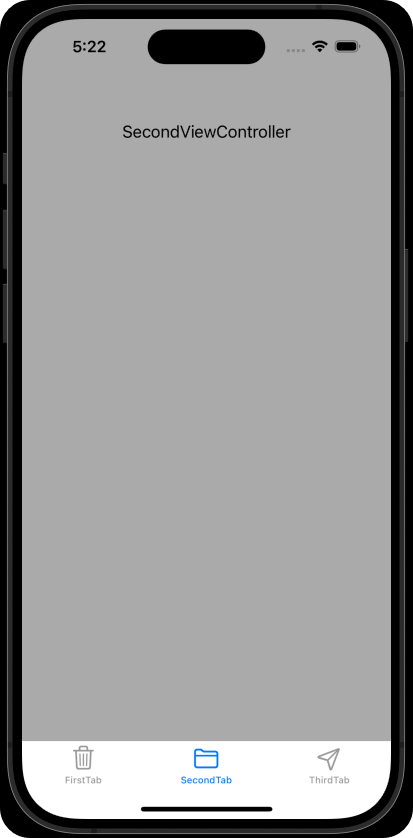
두번째 뷰 컨트롤러는 배경색을 lightGray로 설정

import UIKit

class ThirdViewController: UIViewController {

    private lazy var myLabel: UILabel = {
        let label = UILabel()
        label.text = "ThirdViewController"
        label.font = UIFont.systemFont(ofSize: 18)
        label.textAlignment = .center
        label.textColor = #colorLiteral(red: 0, green: 0, blue: 0, alpha: 1)
        // label.sizeToFit()
        view.addSubview(label) // 추가
        label.numberOfLines = 0 // 줄바꿈 무한

        return label
    }()

    override func viewDidLoad() {
        super.viewDidLoad()
        // Do any additional setup after loading the view.
        view.backgroundColor = .gray
        myLabelSetup()
    }

    // [AutoLayout]
    func myLabelSetup() {
        myLabel.translatesAutoresizingMaskIntoConstraints = false

        NSLayoutConstraint.activate([
            myLabel.leadingAnchor.constraint(equalTo: view.leadingAnchor, constant: 30),
            myLabel.trailingAnchor.constraint(equalTo: view.trailingAnchor, constant: -30),
            myLabel.topAnchor.constraint(equalTo: view.topAnchor, constant: 100),
            myLabel.heightAnchor.constraint(equalToConstant: 40)
        ])
    }


}
세번째 뷰 컨트롤러는 배경색을 gray로 설정
저번 네비게이션 컨트롤러와 마찬가지로 SceneDelegate 파일에서 scene(scene:session:conenctionOPtions:) 함수에 아래와 같이 코드를 추가한다.

guard let windowScene = (scene as? UIWindowScene) else { return }

window = UIWindow(windowScene: windowScene)

// 탭바컨트롤러의 생성
let tabBarVC = UITabBarController()

// 첫번째 화면은 네비게이션컨트롤러로도 만들 수 있음 (기본루트뷰 설정)
let vc1 = ViewController() //UINavigationController(rootViewController: ViewController())
let vc2 = SecondViewController()
let vc3 = ThirdViewController()

// 탭바 이름들 설정
vc1.title = "FirstTab"
vc2.title = "SecondTab"
vc3.title = "ThirdTab"

// 탭바로 사용하기 위한 뷰 컨트롤러들 설정
tabBarVC.setViewControllers([vc1, vc2, vc3], animated: false)
tabBarVC.modalPresentationStyle = .fullScreen
tabBarVC.tabBar.backgroundColor = .white

// 탭바 이미지 설정 (이미지는 애플이 제공하는 것으로 사용)
guard let items = tabBarVC.tabBar.items else { return }
items[0].image = UIImage(systemName: "trash")
items[1].image = UIImage(systemName: "folder")
items[2].image = UIImage(systemName: "paperplane")


// 기본루트뷰를 탭바컨트롤러로 설정
window?.rootViewController = tabBarVC
window?.makeKeyAndVisible()
시뮬레이터


'UIKit' 카테고리의 다른 글
| [TableView] Storyboard + Code 로 설정 (Delegate Pattern) (0) | 2024.08.05 |
|---|---|
| [TabBar] Storyboard로 구현 (0) | 2024.08.02 |
| [Navigation Controller] Code로 세팅 (0) | 2024.08.01 |
| [Navigation Controller] Storyboard로 세팅 (0) | 2024.08.01 |
| [Navigation] Only Code (pushViewController()로 화면 전환) (0) | 2024.08.01 |